


I am happy to be working with this company again and thrilled when they reached out to ask me to showcase two products for them this month.
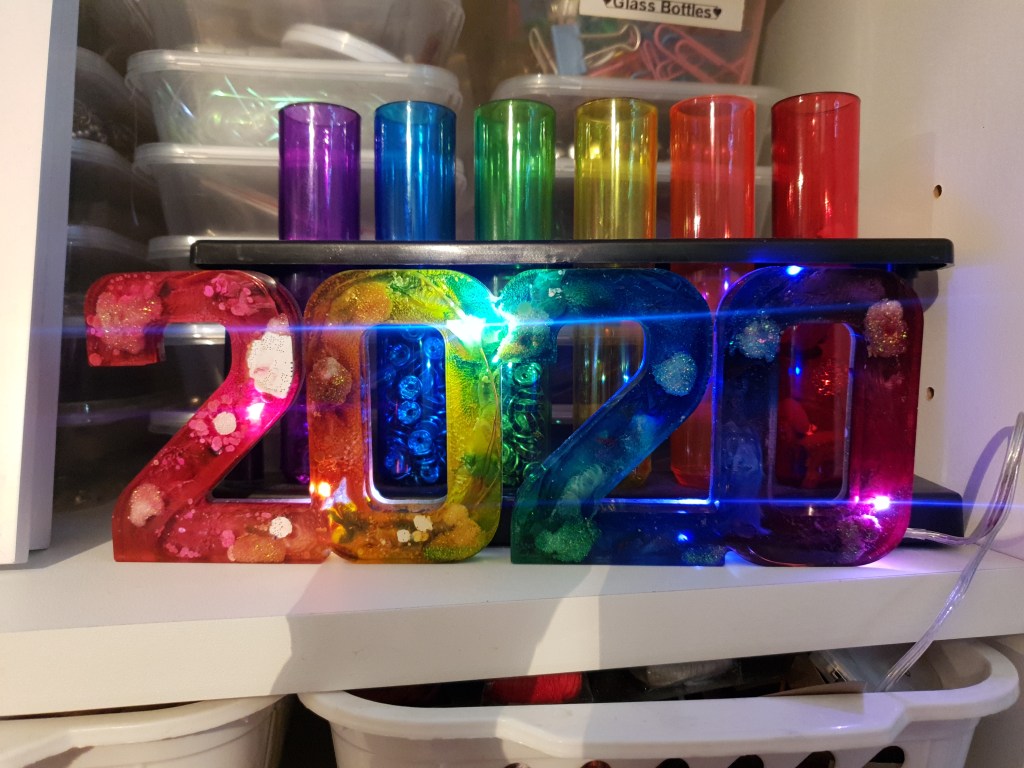
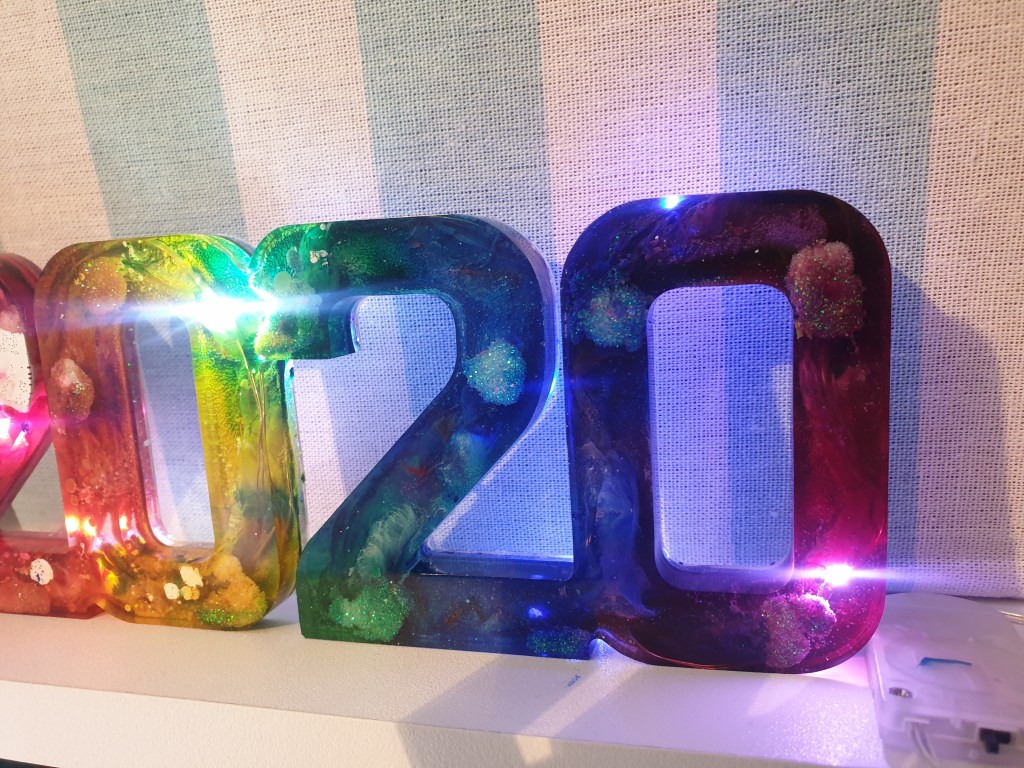
Alcohol Inks and a large resin mould of 2020
To visit their website click here – https://letsresin.com/

I have never used alcohol inks in resin and was so desperate to try out the ‘petri dish’ method which results in gorgeous texture encased within clear resin.
The video is at the bottom of the blog and shows you the steps as I go along. Unfortunately my resin is quite thick and didn’t work well with the ink to get the desired outcome but I will list the general steps required regardless. This technique works best in very fluid almost water like consistency of resin as it allows the ink to flow and fall within it. My resin is cold and thicker and I found even with pre-heating I did not get the exact effect. I did however end up with a pretty piece and you shall see that at the end.
Supplies –
I used my own brand of epoxy resin
14 colour set of Alcohol Ink from let’s resin
2020 large mould from Let’s Resin
Battery operated LED fairy lights from ebay
White glitter (any fine glitter from any brand)
Mixing sticks, cups and precautions. (silicon or re-usable is a good way to prevent from adding to our plastic waste)
**Use gloves, masks and protection when working with resin (due to allergies I cannot wear gloves but I have a fully ventilated area and use barrier cream and keep my skin and are as resin free as possible)Resin is a harmful chemical and exposure poisoning can also come from inhalation of the fumes or drips on the skin.
Method –
This was a complete learning curve for me and the first time properly trying this technique.
1 – If you are a lover of mould release then please prepare your moulds the way you normally would. I don’t usually prep large moulds as I will rarely use them more than a handful of times and did not prep this mould.
2 – Mix up your clear batch of resin per your manufacturers instructions. I made enough to cover about 1cm deep of the entire mould. To find out the volume of a mould you can pre-fill with water and decant into a measuring cup for exact amounts. Make sure if you do this that your mould is completely moisture free before use.
**Optional – You can bend and place your fairy lights at this point in the empty mould, so they become fully seen in your clear layer. Or you can wait until the point I added mine (watch the video) I do suggest if you are waiting till later that you still bend and shape your lights at this point and get them ready to lay in the resin. Don’t make my mistakes LOL
3 – Pour and spread out your clear layer, using alcohol in a spray bottle or low heat to disperse any bubbles that may be there. (Do not overheat your mould as it can cause bonding)
4 – Drip on your colours in the desired position all over your resin. I worked in the colours of the rainbow, but you can be as random as you like. Try not to use a huge amount per layer unless you want it to really sink a lot. I suggest working fast if like me, you have a cold environment that makes your resin thicken up.
5 – Drip your ‘deeper’ white ink for the inks on top, to fall further, or your ‘normal’ white ink for more surface colouring. These will lighten your colours and push them into your resin.
6 – Repeat 4 and 5 two times more or however many layers you think is needed to have the desired effect. You should be able to get down at eye level and look through the edge of the mould to see if the ink is spreading inside the resin.
I ended up with a couple of white spots where I applied white where no colour sat first, so be wary of dripping white directly in the clear resin if you do not want that.
7 – Once you have done this you can do as I did and add some glitter in small areas to sink through your ink and cause more dimension. This is not a required step.
8 – It was at this point I added my lights, pushed them through the ink to cause further texture and then left the whole time to cure for several hours.
9 – I came back to the now set resin and used a flat tool to make sure my wires were pushed down against the surface.
10 – Mix up another half cup of resin, add glitter and add to the mould to conceal ay wires sticking up. Leave to fully cure.
11 – Demould your piece, trim off rough edges and use a sanding file to smooth them away. Leave proud if you intend to dome the back but sand flat if you do not wnat to add another layer.
If you are leaving as is then you can stand your piece up and turn on your lights.
12 – Mix up a quarter cup of the glitter resin and carefully cover the rear of your piece to finish. Leave to cure fully.
Display with pride.
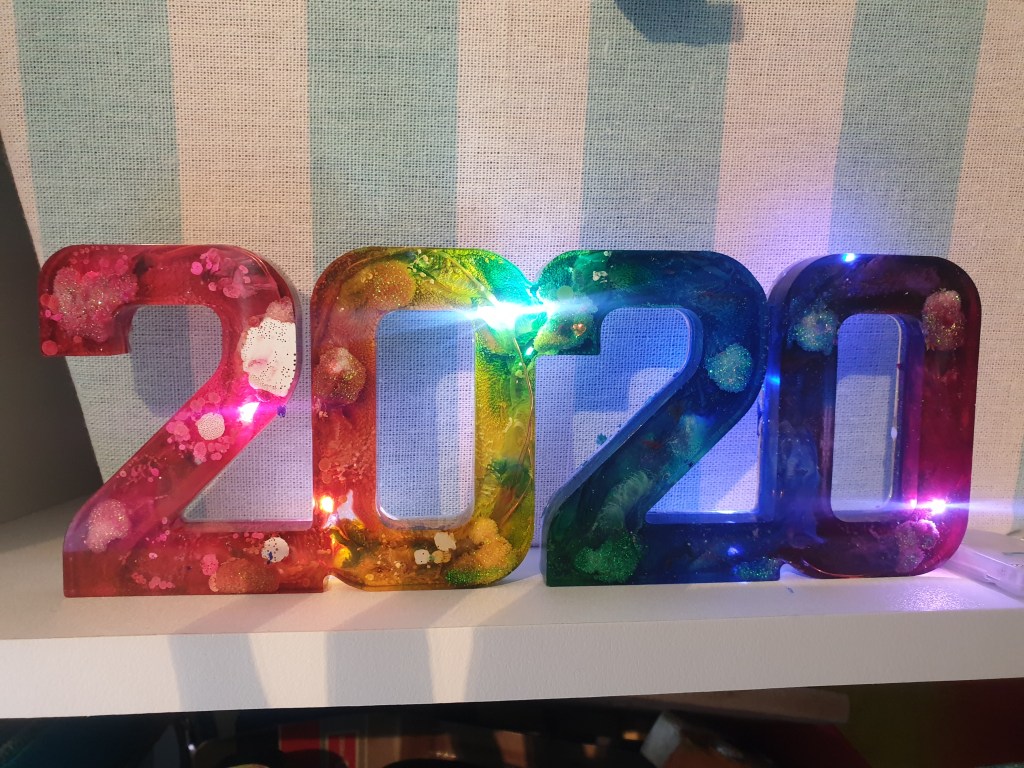


Wow, that is quite the process and such a festive outcome. Nicely done.
LikeLiked by 1 person
Thank you xx
LikeLike